How to flash image?
This page cover the process to flash a new operating system onto a NEON device.
There are 2 methods to flash the NEON-2000-JT2 and NEON-2000-JT2-X:
- Flash over USB
- Clone image to microSD card
Other useful information about flashing a Jetson based device can be found here.
USB Method
This method uses a host machine to flash the internal eMMC storage over USB.
To perform this method the following equipment is required:
- A bare metal machine running Ubuntu. Must not be a virtual machine
- microUSB cable
- 2 x pin jumpers
Step 1: Download image to your host pc with Ubuntu
Neon-2000-JT2
- Jetpack 4.2.1 emmc image
- Jetpack 4.3 v1.0.0 emmc image
- Jetpack 4.3 v1.0.2 emmc image MD5:e70d52d564e09b11b76fa74314c96c79
- Jetpack 4.4 v1.0.3 emmc image MD5:19ee6e9bed2247d5894c3e9066d20b2b
- Jetpack 4.6.1 v1.0.6 emmc image MD5:31a7ddc595ac588633f1ea64275c33b9
Neon-2000-JT2-X
- Jetpack 4.3 v1.0.2 MD5:ddf504b2c600175eacd61777f528b435
- Jetpack 4.4 v1.0.2 MD5:00126a7170cbb82a38707da5ca3e25e3
- Jetpack 4.4 v1.0.2 with EVA MD5:18e818021339e3204065d50b54e91dbd
- Jetpack 4.6.1 v1.0.5 MD5:4f8cbd6dc7b7956186d54b74ccf805b9
Step 2: Checksum
Check md5 checksum to make sure image file is correct
-
Linux
-
$ md5sum [file] -
$ md5sum JT2X_JP44_v1.0.2.tar.gz
-
-
Windows 10
-
$ certutil -hashfile [file] MD5 -
$ certutil -hashfile JT2X_JP44_v1.0.2.tar.gz
-
Step 3: Flash the image to NEON
This step involves connecting the NEON camera to the Host machine and flashing the image.
There is also a video and PDF showing the process
-
On the Host PC unzip the file downloaded in Step 1
$ tar -zxvf Linux_for_Tegra_JetPack43.tar.gzor
$ tar -jxvf A4_Linux_for_Tegra.20200528_JT2_JP43_v1.0.2.tbz2 -
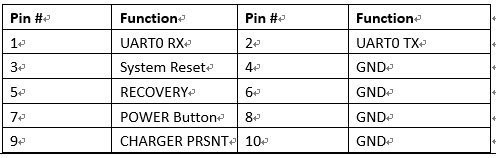
Put the NEON into recovery mode You can refer to pin definition below, and try to enter recover mode.
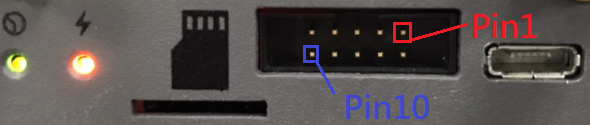
- Power on the NEON
- Short pins 5 and 6 (recovery), using the provided jumpers
- Short pins 3 and 4 (reset), for 2 seconds until the power LED goes out using the provided jumpers
- When the jumper for pins 3 and 4 is removed the power LED will light up again
-
Connect the microUSB cable to the NEON and the Host PC
-
Open a terminal and execute the
lsusbcommand, to see if the NEON is connected. If a device calledNvidia Corp.is detected, the device has successfully entered recovery mode.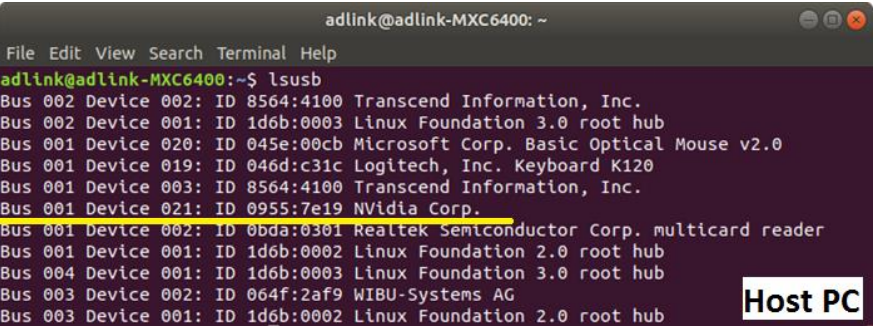
-
Go to folder unzipped in step 1
cd Linux_for_Tegra_JetPack43
- Flash the Neon-2000-JT2
sudo ./flash.sh -r jetson-tx2 mmcblk0p1- To flash the Neon-JT2(jetpack 4.6.1), Neon-JT2X(jetpack 4.6.1), Neon-2000-JNX
sudo ./flash.sh
- To flash the Neon-JT2(jetpack 4.6.1), Neon-JT2X(jetpack 4.6.1), Neon-2000-JNX
Below is a video of the process to flash a NEON-2000-JT2
microSD Card Method
This method involves cloning the operating system image for the NEON camera to a microSD, booting the NEON camera from this image and then optionally copying the image from the microSD card to the internal emmc storage on the NEON camera.
Required tools:
- microSD of at least 32GB
- microSD card reader
If you plan on running the operating system from the microSD permanently, make sure to use a high quality microSD card to prevent corruption
- Download image file:
- Jetpack 4.4 v1.0.3 microSD image MD5:9ccc55b9dec65b15eefee866e6a1fc85
- Jetpack 4.4 v1.0.3 microSD image with EVA_IDE sample
- Check the md5 checksum to make sure image file is correct
- Linux
-
$ md5sum [file] -
$ md5sum JT2_JP44_microSD_v1.0.3.tar.gz
-
- Windows 10
-
$ certutil -hashfile [file] MD5 -
$ certutil -hashfile JT2_JP44_microSD_v1.0.3.tar.gz
-
- Linux
- Unzip the file downloaded in Step 1 to get a
.imgfile
$ tar -zxvf JT2_JP44_microSD_v1.0.3.tar.gz
- Clone image file to microSD card using one of the following methods
- Ubuntu Disk Manager
- Video of process to clone image to microSD card
- Steps:
- Format disk with
GPTpartitioning - Create a volume on the disk of type
Ext4 - Restore image to SD card
- Format disk with
- Linux or Mac using
sudo dd if=<image file>.img of=/dev/sdX bs=4M conv=fsync - Windows using Win32 Disk Imager
- Linux, MacOS or Windows using Balena Etcher
- Ubuntu Disk Manager
- Once cloned, check the boot config file is set to boot from the SD card
- Insert SD card into a machine
- Open file
/<path to sd card>/boot/extlinux/extlinux.conf - Make sure the boot line is set to
/dev/mmcblk2p1
APPEND ${cbootargs} rootfstype=ext4 root=/dev/mmcblk2p1 rw rootwait - Insert SD card into the NEON camera
- Boot NEON
Optional - Clone image from microSD card to internal eMMC in the NEON:
- Mount the internal eMMC
- lsblk
- sudo mkfs -t ext4 /dev/mmcblk0p1
- lsblk -f
- sudo mkdir /media/adlink/ssd
- sudo mount /dev/mmcblk0p1 /media/adlink/ssd
- Clone image from microSD card to internal eMMC using rsync
sudo rsync -axHAWX --numeric-ids --info=progress2 / /media/adlink/ssd
- Change boot config on the internal eMMC to boot from the internal eMMC
mmcblk0p1- Open file
/media/adlink/ssd/boot/extlinux/extlinux.conf - Replace the following
# Replace this line # APPEND ${cbootargs} rootfstype=ext4 root=/dev/mmcblk2p1 rw rootwait # With this line APPEND ${cbootargs} quiet - Open file
- Remove the SD card and reboot the NEON