How to flash image?
EOS-JNX
emmc image and microSD image are one-by-one mapping. That is, you have to flash emmc and microSD image with same version. For example, jetpack 5.0.2 emmc + jetpack 5.0.2 microSD image
Download eMMC image
- jetpack5.1.2 md5: 1203689de27fde2bc7151f27ff5b9e6e
- jetpack5.0.2 md5: 588e91411bb61f5b95b190bebb8373de
- jetpack4.6.1 md5: e9978a1f7d981b11fd9f323a6ca73aa7
- jetpack4.6
- jetpack4.5
How to reflash eMMC image
To perform this step the following equipment is required:
- A bare metal machine running Ubuntu. Must not be a virtual machine.
- microUSB cable
For Jetpack 5.0.2: Install neccessary package at first
sudo apt-get install sshpass
On the Host PC unzip the file downloaded.
tar -zxvf EOS-JNX_JP502_emmc.tar.gzSet EOS-JNX as recovery mode
- Boot EOS-JNX
- Hold RECOVERY button on front panel
- Push RESET button on front panel
- Release RECOVERY button
Connect the microUSB cable to the EOS-JNX and the Host PC
Open a terminal and execute the
lsusbcommand, to see if the NEON is connected. If a device calledNvidia Corp.is detected, the device has successfully entered recovery mode.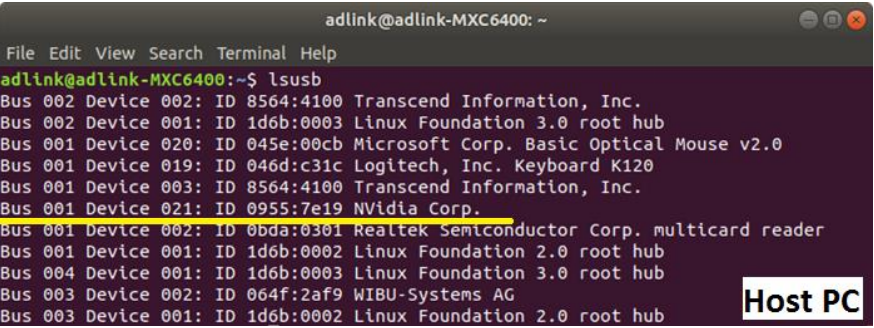
Go to folder unzipped in step 1
cd EOS-JNX_JP502_emmcFlash the EOS-JNX
Jetpack before 5.0.2
sudo ./nvmflash.shFor Jetpack 5.0.2
sudo ./tools/kernel_flash/l4t_initrd_flash.sh --flash-only --massflash 20
Once the flash script is complete and shows
Flash complete (SUCCESS)reboot the EOS-JNX
How to restore eMMC image
method 1
- step1: download environment on Linux x86 ubuntu PC
- https://sftp.adlinktech.com/image/EOS-JNX/deploy.eosjnx.tar.gz
- md5: 0893c0969c1000ab98b1dc60e645d1cc
- step2: untar the file
tar -zxvf deploy.eosjnx.tar.gz
- step3: execute command
sudo ./flash.sh -r -k APP -G backup.img jetson-xavier-nx-eosjnx-emmc mmcblk0p1
- step1: download environment on Linux x86 ubuntu PC
method 2
Backup emmc
cd ~/
mkdir mntTemp
sudo mount /dev/mmcblk0p1 mntTemp
cd mntTemp
sudo tar -jcf ../customerEMMC.tbz2 *
sync
cd ../
sudo umount mntTemp
rmdir mntTemp
- Restore emmc
<div>
  <iframe
      src="https://sftp.adlinktech.com/image/EOS-JNX/sop/Restore_emmc.mp4"
      width="640" height="385"
      scrolling="no" framespacing="0" webkitallowfullscreen mozallowfullscreen allowfullscreen>
  </iframe>
</div>
cd ~/ mkdir mntTemp sudo mount /dev/mmcblk0p1 mntTemp sudo tar jxf customerEMMC.tbz2 -C mntTemp sync sudo umount mntTemp rmdir mntTemp
Download microSD image
SOP
Check sum
$ md5sum EOS-JNX_JP502_emmc.tar.gz
588e91411bb61f5b95b190bebb8373de  EOS-JNX_JP502_emmc.tar.gz

$ md5sum EOS-JNX_JP502_microSD_v1.0.3.img.tar.gz
dda62d5d21f84d25368b5080eaed80e0  EOS-JNX_JP502_microSD_v1.0.3.img.tar.gz
check md5 check sum to make sure image file is correct
- Linux
$ md5sum [file]$ md5sum files.tar.gzWindows 10
certutil -hashfile [file] MD5certutil -hashfile files.tar.gz MD5