PCIe Bus offset breaks communication
When SuperCAT reports Open() Failed to open link layer!, don’t rush into trial and error. Troubleshooting is not blind guessing — it is a process of narrowing the field with logic. This walks you through a systematic diagnosis: from locking the environment, validating the service, and watching the log, to catching the real root cause — a PCIe Bus offset.
- Troubleshooting logic map
- Stage 1 · Stabilise the baseline
- Stage 2 · Diagnostic start & first test
- Stage 3 · Log forensics & tool comparison
- Catch the “missing” NIC
- Stage 4 · Root-cause fix & factory rules
Troubleshooting logic map
The whole process is a funnel: each stage rules out one layer of possibility until only the single truth remains. Build this map in your head first.
Stage 1 · Stabilise the baseline
Before you analyse any code or protocol, the first step is always to lock the environment. If the operating system itself is in flux, any diagnostic result loses its credibility. The core of keeping RTOS running stably is holding the environment “absolutely static”.
| Check item | Standard setting | Risk if ignored |
|---|---|---|
| Windows Update | Fully disabled | May silently change low-level components or settings in the background; settings fail after a reboot |
| System power plan | Set to “High performance” | Power saving can throttle or cut power to the NIC / PCIe device, causing severe communication latency |
| Sleep / Hibernate | Fully disabled | After wake-up RTOS often cannot re-acquire the hardware correctly, breaking communication |
| Driver state | Keep a fixed version after install | Random driver updates can conflict with a previously compatible low-level interface and break stability |
| PCIe slot changes | Never change after configuring | Even a tiny reseat triggers the system to renumber the PCIe Bus, so the software can no longer find the NIC |
The core risk is in the last row. Even if the system reports RTOS has been closed, license not found, as long as you first confirm the environment is static you can rule out external interference and shift focus to validating the software service and the hardware pairing.
Stage 2 · Diagnostic start & first test
The logic of this stage is to rule out a core fault — confirm whether the SuperCAT core service and licensing can run. If the core starts but the function fails, the problem is not in the software itself but points to an external connection (such as the NIC communication layer).
:: 1. Go to the tool's folder
cd C:\Users\ADLINK\AppData\Roaming\ADLINK\runbat

:: 2. Start the diagnostic logger to check core state
RTOS_service_tool.exe -startlog
At the very bottom of the window, if you see RTOS started successfully. Ok, the software core and license are both fine, and the problem is pinned to “the software cannot find the hardware NIC”.
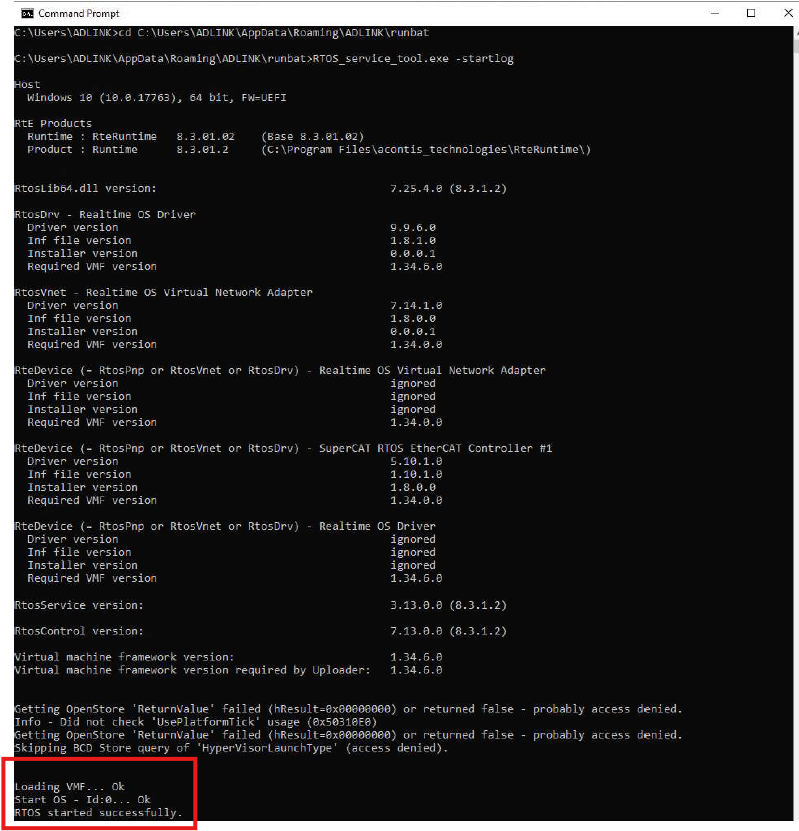
Before the next step of log analysis, you must stop the service first to avoid leaving the system mounted in a bad state:
RTOS_service_tool.exe -stop
Stage 3 · Log forensics & tool comparison
This is the most critical evidence-driven part of the diagnostic mindset. We stop guessing and instead raise the log detail to force the system to expose the break point in hardware communication.
- Raise the log level — open RTOS configurator and set Log Level to
2. This is essential, because only Level 2 fully captures the Link Layer initialisation (Handshake) in detail. - Start the listener — open Putty and connect to the system output (usually a Serial or dedicated monitoring port), then run RTOS again.
- Spot the fatal error — if Putty shows the red line
Open() Failed to open link layer!, that is the hard evidence of a failed hardware link layer: the system is explicitly saying it cannot find the NIC at the specified address.
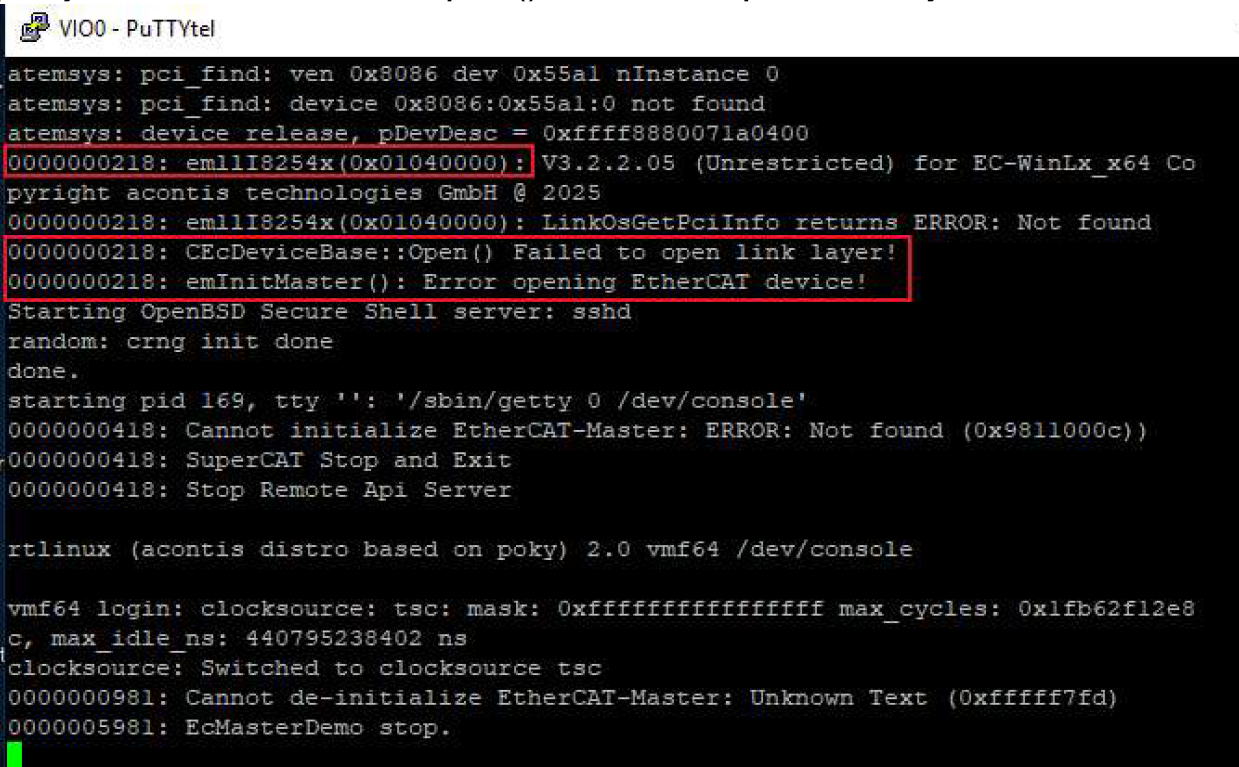
Catch the “missing” NIC
The evidence points to a NIC address offset. Next, compare the “current” and the “configured” values side by side:
- Configured value (the remembered address) — check RTOS System Monitor;
Assign NICrecords the address written into the parameters at setup time. - Current value (the real address) — open Windows Device Manager and look at the “Location” in the NIC’s properties.
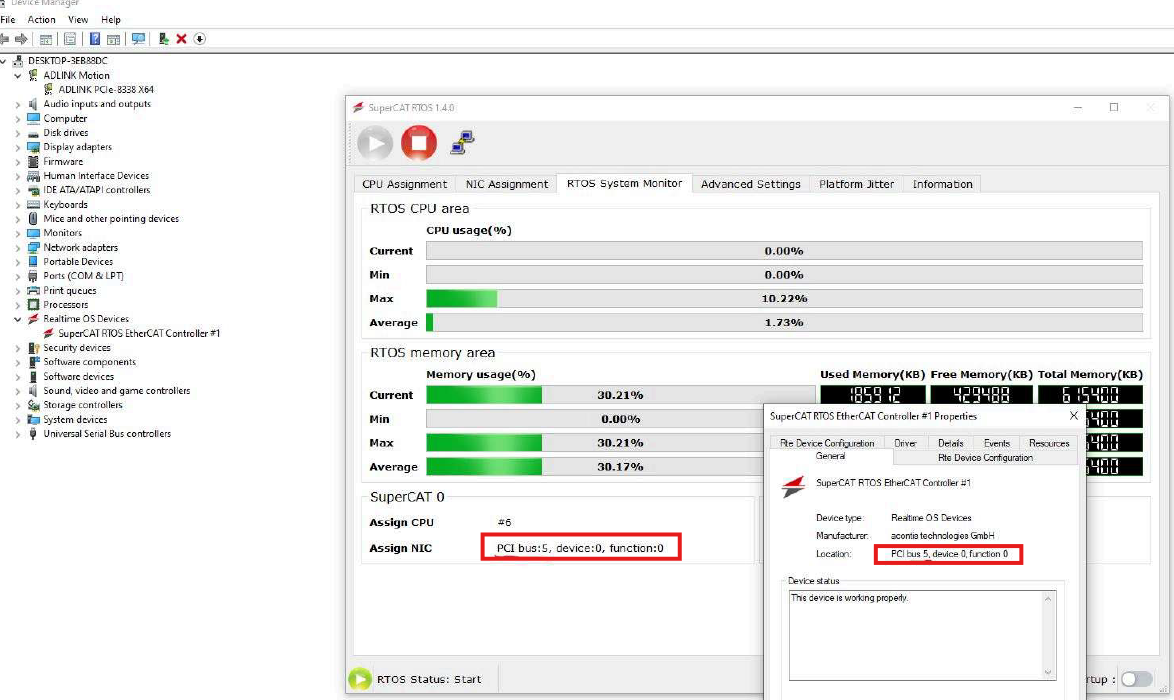
✔ Normal: Assign NIC = bus 5 matches Location = PCI bus 5 → communication OK
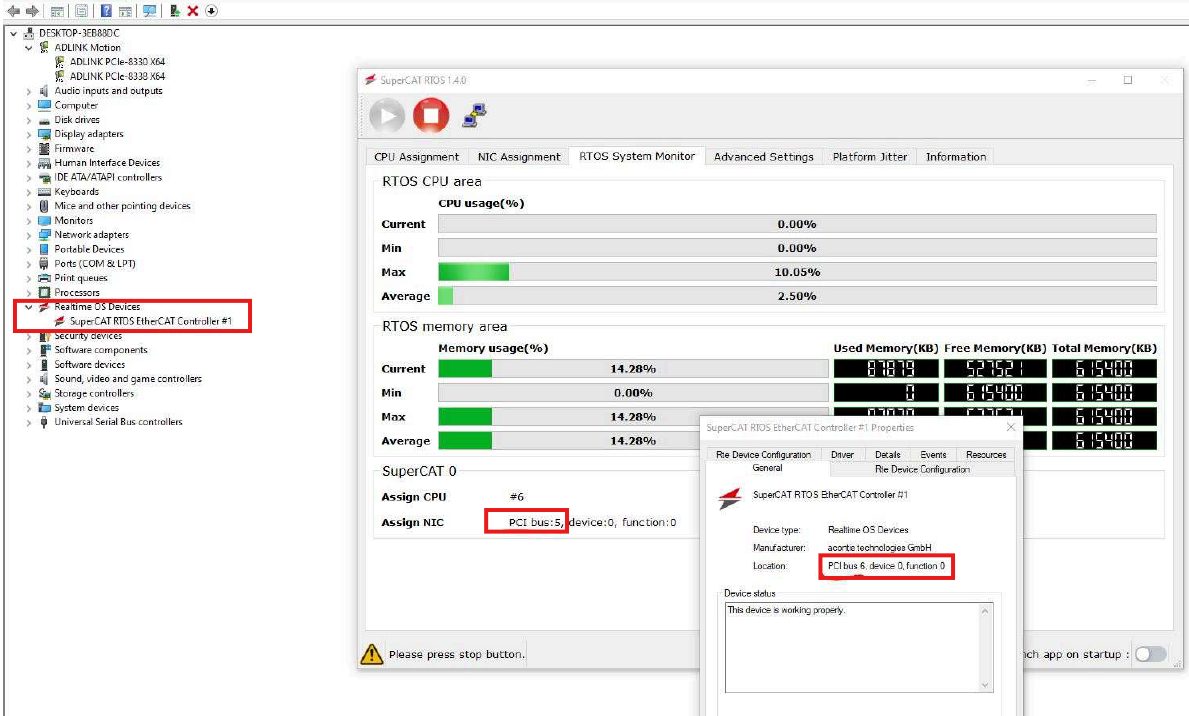
✘ Fault: Assign NIC = bus 5 but Location = PCI bus 6 → Bus offset, the system will fail
Evidence checklist:
- Bus Number — is it still
Bus 5? (If it changed toBus 6, the system will fail.) - Device / Function — do the values exactly match
EC_T_LINK_PARMSin the config file?
Stage 4 · Root-cause fix & factory rules
Once you confirm the broken communication is caused by a PCIe Bus offset, follow the standard operating procedure to restore it and set up long-term prevention.
Fix checklist
- Software reset (recommended) — in the RTOS settings interface, hand
NIC Assignmentback to Windows, then redo the NIC assignment and setup once so the system re-writes the correct Bus ID. - Hardware restore — if the problem was caused by a newly added card, try removing it or returning it to its original slot to restore the original bus assignment.
Factory rules: declare a static environment — to reach industrial-grade stability, follow these three:
- Keep the environment static — hold the OS static and disable everything that could trigger a rescan of the hardware bus (Windows Update, sleep).
- Lock the configuration — “Set up all hardware cards and Windows updates first, then install SuperCAT, and never touch it again.” This is the one truth that avoids a Bus ID offset.
- Fix the architecture — even an unrelated PCIe card, if moved, can make the motherboard reassign the NIC address. Never change any hardware slot after the system goes live.
With this logic, you are no longer just “trying to fix” — you are proving the truth.