How to flash image?
This page covers how to flash a new operating system onto a NEON camera.
Neon-2000-JNX (Jetson Xavier NX)
- Storage to flash: internal eMMC + microSD card
- Steps: 1 → 2 → 3 → 4
- Product page / EOS-JNX
Neon-2000-ONO (Jetson Orin Nano)
- Storage to flash: internal eMMC
- Steps: 1 → 3 → 4
- Not sure whether your system runs from the eMMC or the microSD card? See How to check the boot device?
- Highest version supported by NVIDIA for each model: JetPack support matrix
- Check your current version on the NEON:
head -n1 /etc/nv_tegra_release
Requirements:
- A PC with Ubuntu, to flash the NEON over microUSB
- microUSB cable
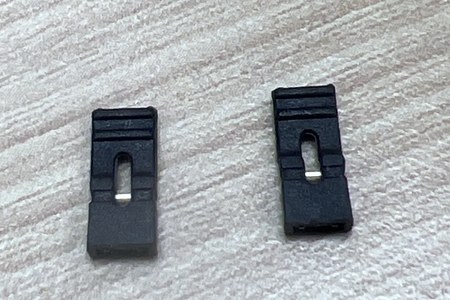
- 2 pin jumpers, included with the NEON
- JNX only: microSD card of at least 32GB and a card reader
Step 1: Download images
Neon-2000-JNX
eMMC and microSD must be the same JetPack version. Download the microSD image and the eMMC image from the same row.
| JetPack (L4T) | microSD image | eMMC image |
|---|---|---|
| 5.1.2 (35.4.1) latest |
v1.0.9 (pylon 5.2, without EVA) MD5: 81992a6ada7f01ee30206680bdc4e878 |
v1.0.9 MD5: dc01fad05c3ca7df2b5096bc27877b95 |
| 5.0.2 (35.1) | v1.0.8 (pylon 7.2.1 + EVA 4.0.2) MD5: 79d87d4dc0ef2440845dccb1d0a33d4bv1.0.7 (pylon 5.2) MD5: c60395f01cd76131c25f3bf96ed53543 |
v1.0.7 MD5: 73758afcdf0119a98b27c9d1630add6a |
| 4.6.1 (32.7.1) | v1.0.5 MD5: 564951bdd6074db6e853037b1338e905v1.0.6 (EVA 3.8.3) MD5: 8b4e3d4ce7bf7e69bc90b04e98e14851 |
v1.0.5 MD5: f08d89a8aa4927b7df7af449c2f8edd9 |
| 4.5 (32.5.0) | v1.0.3 MD5: 243b98f10a873f2830e4f635eab7c80dv1.0.4 (EVA 3.5) MD5: 43b5931b625e3b598423e0bb4a131d6e |
v1.0.3 MD5: e603db76e8ab1bbe5596760d40adb90c |
Check the MD5
Make sure the downloaded file is complete. The result must match the MD5 above.
- Linux:
md5sum <file> - Windows:
certutil -hashfile <file> MD5
Step 2: Flash the microSD card
Neon-2000-JNX
- Unzip the microSD file to get a
.imgfile:tar -zxvf <file> - Write the
.imgfile to the microSD card- Ubuntu:
sudo dd if=<image file>.img of=/dev/sdX bs=4M conv=fsync, or Disks (video) - Windows: Win32 Disk Imager
- Linux, macOS or Windows: Balena Etcher
- Ubuntu:
- Insert the microSD card into the NEON
Use a high quality microSD card to prevent corruption.
Neon-2000-ONO
Not needed. Go to Step 3.Step 3: Enter recovery mode
- Power on the NEON
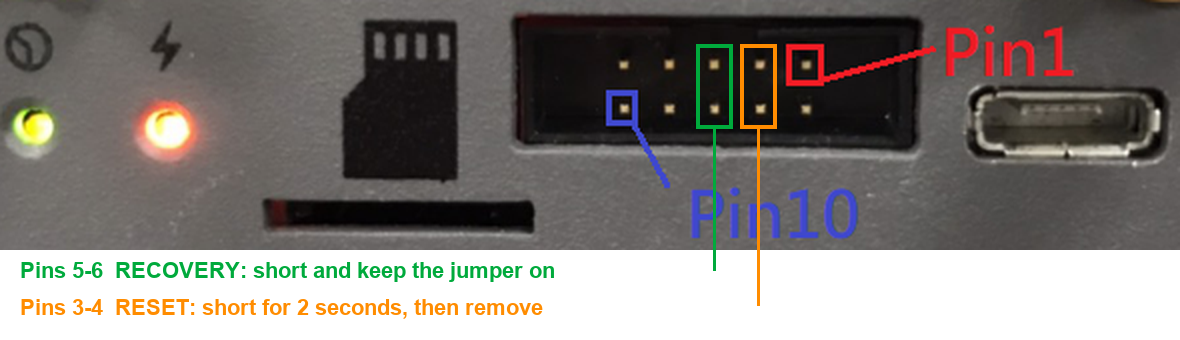
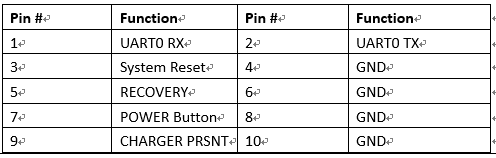
- Short pins 5 and 6 (RECOVERY, green box) and keep this jumper on until flashing is complete
- Short pins 3 and 4 (RESET, orange box) for 2 seconds until the power LED goes out, then remove this jumper. The power LED lights up again
- Connect the microUSB cable to the NEON and the host PC
Video:
Step 4: Flash the eMMC
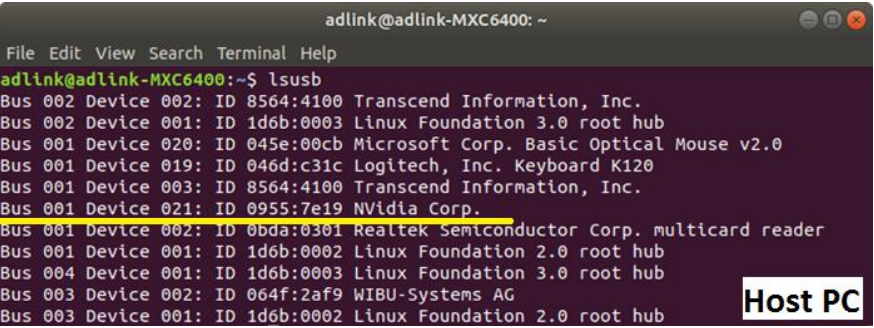
First, run lsusb on the host PC. Nvidia Corp. in the list = the NEON is in recovery mode and ready to flash.
Then unzip the eMMC image, go to the folder and run the flash command. Do not unplug the microUSB cable or the power while flashing.
Neon-2000-JNX
Unzip: tar -zxvf <file>
| JetPack | Folder after unzip | Flash command | Finished when you see |
|---|---|---|---|
| 5.1.2 | NeonJNX_A3_JP512_emmc_v1.0.9 |
sudo apt-get install sshpasssudo ./tools/kernel_flash/l4t_initrd_flash.sh --flash-only --massflash 1 |
Success (about 13 min) |
| 5.0.2 | NeonJNX_A3_JP502_emmc_v1.0.7 |
sudo apt-get install sshpasssudo ./tools/kernel_flash/l4t_initrd_flash.sh --flash-only --massflash 1 |
Success |
| 4.6.1 | JNX_JP461_emmc_v1.0.5 |
sudo ./flash.sh |
Flash complete (SUCCESS) |
| 4.5 | JNX_JP45_v1.0.2 |
sudo ./flash.sh |
Flash complete (SUCCESS) (about 5 min) |
Neon-2000-ONO
Unzip: sudo tar -I lbzip2 -xf <file>
| JetPack | Folder after unzip | Flash command | Finished when you see |
|---|---|---|---|
| 6.2 / 6.1 / 5.1.2 | mfi_jetson-orin-nano-neon2000-ono_4-<L4T>-rel.<ver>(no _release suffix) |
sudo ./tools/kernel_flash/l4t_initrd_flash.sh --flash-only --massflash 15 --network usb0 |
Flash complete (SUCCESS) |
When finished: power off the NEON, remove the pins 5-6 jumper, (JNX) make sure the microSD card from Step 2 is inserted, and power on.
Check the version: head -n1 /etc/nv_tegra_release
More about flashing Jetson devices: NVIDIA documentation
Appendix: Back up and restore the JNX eMMC
Method 1
- Download the environment on a Linux x86 Ubuntu PC: https://sftp.adlinktech.com/image/Neon-JNX/deploy.neonjnx.tar.gz (MD5:
d9e7e4ff4030f7d81f72c353aad6d272) tar -zxvf deploy.neonjnx.tar.gzsudo ./flash.sh -r -k APP -G backup.img <board name> mmcblk0p1- HW A3:
jetson-neonjnx-a3-emmc - HW A2:
jetson-xavier-nx-neonjnx-emmc
- HW A3:
- Download the environment on a Linux x86 Ubuntu PC: https://sftp.adlinktech.com/image/Neon-JNX/deploy.neonjnx.tar.gz (MD5:
Method 2
- Back up
cd ~/ mkdir mntTemp sudo mount /dev/mmcblk0p1 mntTemp cd mntTemp sudo tar -jcf ../customerEMMC.tbz2 * sync cd ../ sudo umount mntTemp rmdir mntTemp- Restore
cd ~/
mkdir mntTemp
sudo mount /dev/mmcblk0p1 mntTemp
sudo tar jxf customerEMMC.tbz2 -C mntTemp
sync
sudo umount mntTemp
rmdir mntTemp