Getting Start
Introduction
ADLINK Launches Image Sensor Integrated NVIDIA Jetson Nano AI Camera Dev Kit for Easy, Rapid AI Vision Prototyping
Summary:
- A vision development kit with the NVIDIA® Jetson Nano module and image sensor, industrial DI/O, issue-free integration with affordable price
- Get started quickly with add-on AI vision applications and sample code for rapid AI vision prototyping
- Easy leverage to vast NVIDIA, OpenCV and G-streamer resources through V4L2 video interface
- ADLINK exclusive EVA provides selected AI models, tools of training & labeling and SOP, easy to build a PoC without issues.
- High extensibility: seamlessly transfer the AI Camera Dev Kit to ADLINK industrial vision devices and systems
ADLINK Technology Inc., a global leader in edge computing, launched its NVIDIA Jetson Nano based vision developer kit — AI Camera Dev Kit. ADLINK is applying its 25-year machine vision design experience in an effort to meet the needs of AI vision developers for rapid concept validation and viability testing and has launched a pocket-sized developer kit with image sensor, lens, vertical I/O, varied peripherals, and exclusive ADLINK edge vision analytics software – EVA. Accordingly, the AI Camera Dev Kit delivers low cost, simple integration, fast development, and easy access to open resources and high extensibility to accelerate AI vision prototyping while seamlessly enabling users to convert the kit to ADLINK edge AI vision devices.
ADLINK’s AI Camera Dev Kit includes an 8MP color MIPI camera module; NVIDIA® Jetson Nano™ SOC; LAN; industrial DI/O interface; USB Type-C hub for easy powering, display, keyboard/mouse connection and data transmission; SD memory card with Linux OS; NVIDIA JetPack SDK; OpenCV and ADLINK’s exclusive EVA software—everything you need to start AI Vision prototyping.
To help streamline software development, the kit includes two pre-installed ready-to-use AI vision applications, Pose Detection and Object Classification, with open-source training, a labeling tool and SOP that are easy to learn and modify. These two applications can be applied on the scenarios like the Robot Hazard Prevention and Fab Clear SOP or similar applications such as virtual fences or other SOP compliance. ADLINK EVA is our exclusive no-code/low-code GUI-based edge vision analytics software. The intuitive GUI pipeline development environment provides fast and flexible image capturing and AI inference to logical judgement configuration. Follow the EVA SOP, users can train their own AI model on the powerful computers and migrate it to the AI Camera Dev Kit. The ADLINK EVA Portal also provides tutorials, application templates and resources for effortless PoC development.
Today’s market trend is to start project development from a developer kit that can quickly help developers test and demonstrate their concept. Targeted for the booming AI vision market, ADLINK provides an image sensor integrated AI camera developer kit based on our popular NEON series AI smart camera. The AI Camera Dev Kit eliminates tedious integration effort with its built-in no-code GUI software (EVA) and two AI applications with sample code. This kit enables users to start their AI vision PoC in just five minutes,” said Kevin Hsu, ADLINK´s senior product manager for edge vision products. “Based on the V4L2 interface, users can easily access all NVIDIA Tao and NGC catalog resources that they are familiar with. The AI camera dev kit leverage the experience and advantage of our most popular product NEON series AI Smart Camera with affordable price, is ideal for development of a wide range of edge vision and AI.
The ADLINK AI Camera Dev Kit can accelerate AI vision prototyping and seamlessly enable users to convert the kit to ADLINK edge AI vision devices. The AI Camera Dev Kit is available now. Follow the links for further information about ADLINK’s AI Camera Dev Kit and EVA software.
User Interface
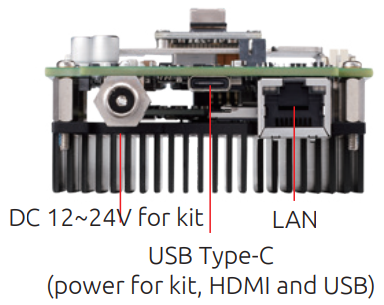
Front view
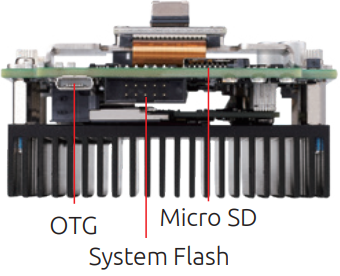
Back view
Purchase optional accessories for your custom use case:
To extend monitor, keyboard/mouse and power supply capabilities
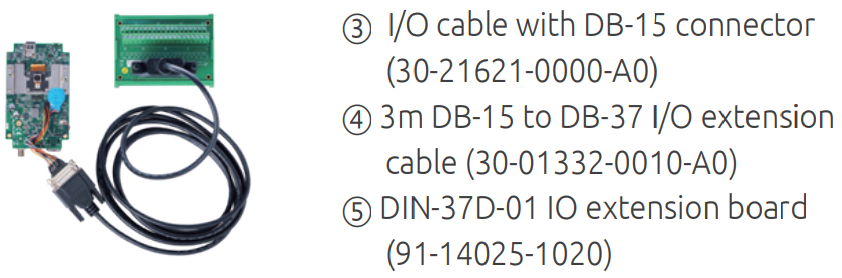
To connect to digital I/O devices:
How to wiring
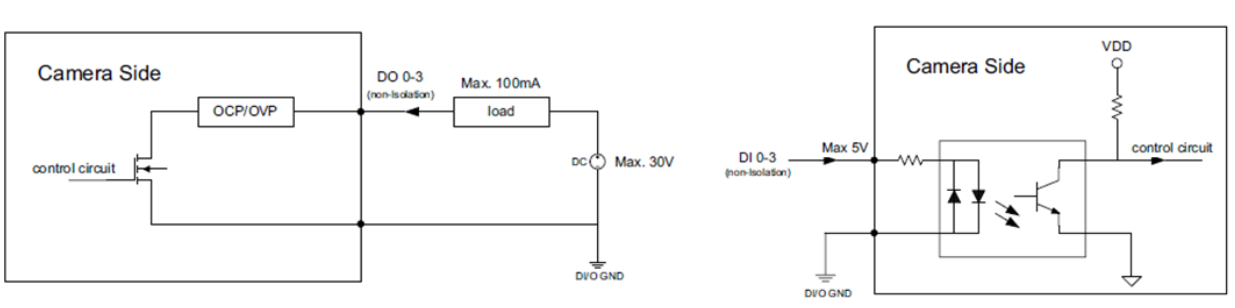
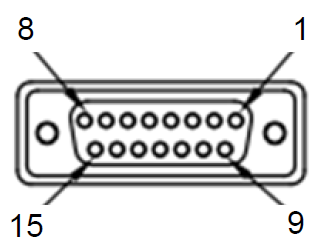
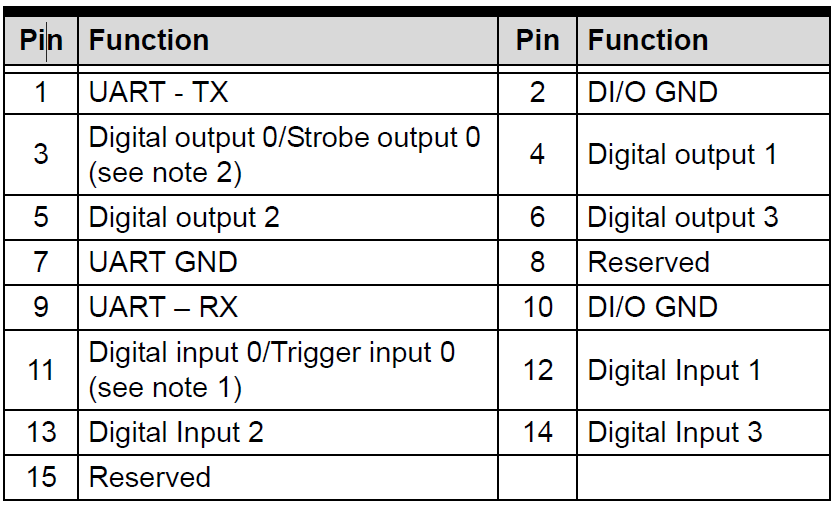
D-sub I/O Connector
Unboxing
Following the video to unbox your AI camera dev kit. Learn to impletement AI application: Geo-fence and SOP compliance. Note: Open English Caption if needed.
Please refer to What is Adlink AI Suite? to know more info about the applications.
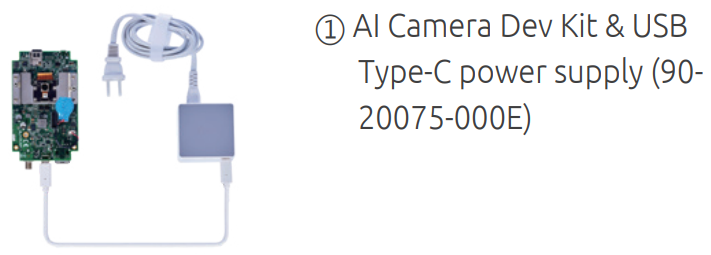
Optional Accessories:
① USB Type-C hub/adapter/30cm USB Type-C cable (92-99090-1010)
② 1.8m USB Type-C cable with screw lock (30-01284-0030-A0)
③ I/O cable with DB-15 connector (30-21621-0000-A0)
④ 3m DB-15 to DB-37 I/O extension cable (30-01332-0010-A0)
⑤ DIN-37D-01 IO extension board (91-14025-1020)
⑥ AI camera kit tripod bracket (91-95340-000E)
⑦ AI camera kit acrylic plate (91-95341-000E)

This page cover the process to flash a new operating system onto a NEON-2000-JNX and EOS-JNX device.
The process to flash one of these device is slightly different to the process to flash a NEON-2000-JT2 device. To flash a JNX device you need to flash both the internal eMMC and external storage device. The internal eMMC device hosts the bootloader and kernel, the external storage device hosts the operating system and Jetpack.
Other useful information about flashing a Jetson based device can be found here.
Step 1: Download image to your host pc with Ubuntu
If upgrading the Jetpack version make sure to also download the eMMC image. This is because the internal eMMC and microSD card must be flashed with same version of Jetpack. For example, jetpack 5.0.2 emmc + jetpack 5.0.2 microSD image
Neon-2000-JNX
microSD image
- Jetpack 5.0.2 v1.0.8 microSD image (with pylon6.2.1 + EVA4.0.2) MD5:79d87d4dc0ef2440845dccb1d0a33d4b
- Jetpack 5.0.2 v1.0.7 microSD image (with pylon5.2) MD5:c60395f01cd76131c25f3bf96ed53543
- Jetpack 4.6.1 v1.0.5 microSD image
- Jetpack 4.6.1 v1.0.6 microSD image (with EVA 3.8.3) MD5:8b4e3d4ce7bf7e69bc90b04e98e14851
- Jetpack 4.5 v1.0.3 microSD image MD5:243b98f10a873f2830e4f635eab7c80d
- Jetpack 4.5 v1.0.4 microSD image (with EVA 3.5) MD5:43b5931b625e3b598423e0bb4a131d6e
eMMC image - required if changing Jetpack version
- Jetpack 5.0.2 emmc image MD5:73758afcdf0119a98b27c9d1630add6a
- Jetpack 4.6.1 emmc image MD5:1442d6597b6c93e8fff2543a808652ce
- Jetpack 4.5 emmc image MD5:e603db76e8ab1bbe5596760d40adb90c
Checksum
Check the md5 checksum to make sure image file is correct
- Linux
$ md5sum [file]$ md5sum NeonJNX_A3_JP502_emmc_v1.0.7.tar.gzWindows 10
$ certutil -hashfile [file] MD5$ certutil -hashfile NeonJNX_A3_JP502_emmc_v1.0.7.tar.gz MD5
Step 2: Flash microSD card image
To flash the microSD card you are going to need the following:
- microSD of at least 32GB
- microSD card reader
Make sure to use a high quality microSD card to prevent corruption
Unzip the microSD zip file downloaded in Step 1 to get a
.imgfiletar -zxvf NeonJNX_A3_JP502_microSD_v1.0.7_woEVA.img.tar.gzClone image file to microSD card using one of the following methods
- Ubuntu Disk Manager
- Video of process to clone image to microSD card
- Steps:
- Format disk with
GPTpartitioning - Create a volume on the disk of type
Ext4 - Restore image to SD card
- Format disk with
- Linux or Mac using
sudo dd if=<image file>.img of=/dev/sdX bs=4M conv=fsync - Windows using Win32 Disk Imager
- Linux, MacOS or Windows using Balena Etcher
- Ubuntu Disk Manager
Insert SD card into the NEON camera
Step 3: Flash eMMC image
The internal eMMC must be flashed if the Jetpack version on the microSD card has changed, so the Jetpack version on the eMMC and microSD card match.
This step involves connecting the NEON camera to the Host machine and flashing the image.
To perform this step the following equipment is required:
- A bare metal machine running Ubuntu. Must not be a virtual machine
- microUSB cable
- 2 x pin jumpers
There is also a video and PDF showing the process
On the Host PC unzip the file downloaded in Step 1
tar -zxvf NeonJNX_A3_JP502_emmc_v1.0.7.tar.gzPut the NEON into recovery mode You can refer to pin definition below, and try to enter recover mode.
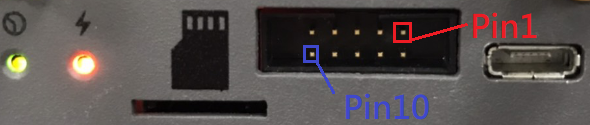
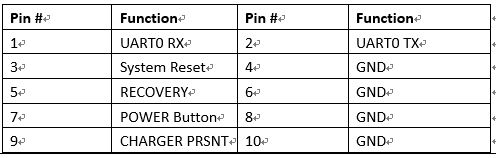
- Power on the NEON
- Short pins 5 and 6 (recovery), using the provided jumpers
- Short pins 3 and 4 (reset), for 2 seconds until the power LED goes out using the provided jumpers
- When the jumper for pins 3 and 4 is removed the power LED will light up again
Connect the microUSB cable to the NEON and the Host PC
Open a terminal and execute the
lsusbcommand, to see if the NEON is connected. If a device calledNvidia Corp.is detected, the device has successfully entered recovery mode.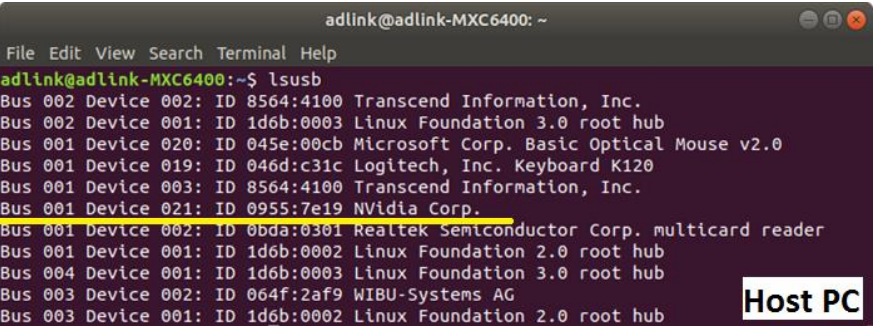
Go to folder unzipped in step 1
cd NeonJNX_A3_JP502_emmc_v1.0.7Flash the Neon-2000-JNX
For Jetpack 5.0.2: Install neccessary package at first
sudo apt-get install sshpassJetpack before 5.0.2
sudo ./flash.shFor Jetpack 5.0.2
sudo ./tools/kernel_flash/l4t_initrd_flash.sh --flash-only --massflash 1
Once the flash script is complete and shows
Flash complete (SUCCESS)reboot the NEON
Below is a video of the process to flash a NEON-2000-JNX
Appendix: How to restore eMMC image
method 1
- step1: download environment on Linux x86 ubuntu PC
- https://sftp.adlinktech.com/image/Neon-JNX/deploy.neonjnx.tar.gz
- md5: d9e7e4ff4030f7d81f72c353aad6d272
- step2: untar the file
tar -zxvf deploy.neonjnx.tar.gz
- step3: execute command
sudo ./flash.sh -r -k APP -G backup.img jetson-xavier-nx-neonjnx-emmc mmcblk0p1- Note: Booard name of different hardware version
- HW A3: jetson-neonjnx-a3-emmc
- HW A2: jetson-xavier-nx-neonjnx-emmc
- step1: download environment on Linux x86 ubuntu PC
method 2
Backup emmc
cd ~/
mkdir mntTemp
sudo mount /dev/mmcblk0p1 mntTemp
cd mntTemp
sudo tar -jcf ../customerEMMC.tbz2 *
sync
cd ../
sudo umount mntTemp
rmdir mntTemp
- Restore emmc
<div>
  <iframe
      src="https://sftp.adlinktech.com/image/EOS-JNX/sop/Restore_emmc.mp4"
      width="640" height="385"
      scrolling="no" framespacing="0" webkitallowfullscreen mozallowfullscreen allowfullscreen>
  </iframe>
</div>
cd ~/ mkdir mntTemp sudo mount /dev/mmcblk0p1 mntTemp sudo tar jxf customerEMMC.tbz2 -C mntTemp sync sudo umount mntTemp rmdir mntTemp