How to flash image?
This page cover the process to flash a new operating system onto a NEON-2000-JNX and EOS-JNX device.
The process to flash one of these device is slightly different to the process to flash a NEON-2000-JT2 device. To flash a JNX device you need to flash both the internal eMMC and external storage device. The internal eMMC device hosts the bootloader and kernel, the external storage device hosts the operating system and Jetpack.
Other useful information about flashing a Jetson based device can be found here.
Step 1: Download image to your host pc with Ubuntu
If upgrading the Jetpack version make sure to also download the eMMC image. This is because the internal eMMC and microSD card must be flashed with same version of Jetpack. For example, jetpack 5.0.2 emmc + jetpack 5.0.2 microSD image
Neon-2000-JNX
microSD image
- Jetpack 5.1.2 v1.0.9 microSD image (with pylon5.2 + without EVA) MD5:81992a6ada7f01ee30206680bdc4e878
- Jetpack 5.0.2 v1.0.8 microSD image (with pylon7.2.1 + EVA4.0.2) MD5:79d87d4dc0ef2440845dccb1d0a33d4b
- Jetpack 5.0.2 v1.0.7 microSD image (with pylon5.2) MD5:c60395f01cd76131c25f3bf96ed53543
- Jetpack 4.6.1 v1.0.5 microSD image MD5:564951bdd6074db6e853037b1338e905
- Jetpack 4.6.1 v1.0.6 microSD image (with EVA 3.8.3) MD5:8b4e3d4ce7bf7e69bc90b04e98e14851
- Jetpack 4.5 v1.0.3 microSD image MD5:243b98f10a873f2830e4f635eab7c80d
- Jetpack 4.5 v1.0.4 microSD image (with EVA 3.5) MD5:43b5931b625e3b598423e0bb4a131d6e
eMMC image - required if changing Jetpack version
- Jetpack 5.1.2 emmc image MD5:dc01fad05c3ca7df2b5096bc27877b95
- Jetpack 5.0.2 emmc image MD5:73758afcdf0119a98b27c9d1630add6a
- Jetpack 4.6.1 emmc image MD5:f08d89a8aa4927b7df7af449c2f8edd9
- Jetpack 4.5 emmc image MD5:e603db76e8ab1bbe5596760d40adb90c
Checksum
Check the md5 checksum to make sure image file is correct
- Linux
$ md5sum [file]$ md5sum NeonJNX_A3_JP512_emmc_v1.0.9.tar.gzWindows 10
$ certutil -hashfile [file] MD5$ certutil -hashfile NeonJNX_A3_JP512_emmc_v1.0.9.tar.gz MD5
Step 2: Flash microSD card image
To flash the microSD card you are going to need the following:
- microSD of at least 32GB
- microSD card reader
Make sure to use a high quality microSD card to prevent corruption
Unzip the microSD zip file downloaded in Step 1 to get a
.imgfiletar -zxvf NeonJNX_A3_JP512_microSD_v1.0.9_woEVA.img.tar.gzClone image file to microSD card using one of the following methods
- Ubuntu Disk Manager
- Video of process to clone image to microSD card
- Steps:
- Format disk with
GPTpartitioning - Create a volume on the disk of type
Ext4 - Restore image to SD card
- Format disk with
- Linux or Mac using
sudo dd if=<image file>.img of=/dev/sdX bs=4M conv=fsync - Windows using Win32 Disk Imager
- Linux, MacOS or Windows using Balena Etcher
- Ubuntu Disk Manager
Insert SD card into the NEON camera
Step 3: Flash eMMC image
The internal eMMC must be flashed if the Jetpack version on the microSD card has changed, so the Jetpack version on the eMMC and microSD card match.
This step involves connecting the NEON camera to the Host machine and flashing the image.
To perform this step the following equipment is required:
- A bare metal machine running Ubuntu. Must not be a virtual machine
- microUSB cable
- 2 x pin jumpers
There is also a video and PDF showing the process
On the Host PC unzip the file downloaded in Step 1
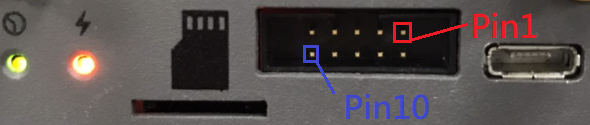
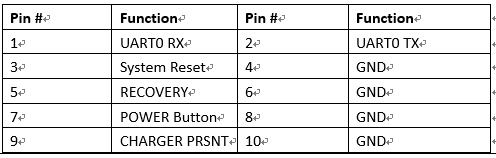
tar -zxvf NeonJNX_A3_JP512_emmc_v1.0.9.tar.gzPut the NEON into recovery mode You can refer to pin definition below, and try to enter recover mode.
- Power on the NEON
- Short pins 5 and 6 (recovery), using the provided jumpers
- Short pins 3 and 4 (reset), for 2 seconds until the power LED goes out using the provided jumpers
- When the jumper for pins 3 and 4 is removed the power LED will light up again
Connect the microUSB cable to the NEON and the Host PC
Open a terminal and execute the
lsusbcommand, to see if the NEON is connected. If a device calledNvidia Corp.is detected, the device has successfully entered recovery mode.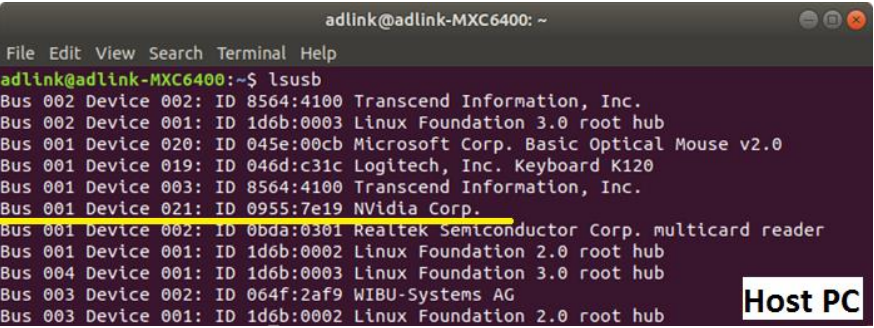
Go to folder unzipped in step 1
cd NeonJNX_A3_JP512_emmc_v1.0.9Flash the Neon-2000-JNX
For Jetpack 5.0.2: Install neccessary package at first
sudo apt-get install sshpassJetpack before 5.0.2
sudo ./flash.shFor Jetpack 5.0.2 ~ 5.1.2
sudo ./tools/kernel_flash/l4t_initrd_flash.sh --flash-only --massflash 1
Once the flash script is complete and shows
Flash complete (SUCCESS)reboot the NEON
Below is a video of the process to flash a NEON-2000-JNX
Appendix: How to restore eMMC image
method 1
- step1: download environment on Linux x86 ubuntu PC
- https://sftp.adlinktech.com/image/Neon-JNX/deploy.neonjnx.tar.gz
- md5: d9e7e4ff4030f7d81f72c353aad6d272
- step2: untar the file
tar -zxvf deploy.neonjnx.tar.gz
- step3: execute command
sudo ./flash.sh -r -k APP -G backup.img jetson-xavier-nx-neonjnx-emmc mmcblk0p1- Note: Booard name of different hardware version
- HW A3: jetson-neonjnx-a3-emmc
- HW A2: jetson-xavier-nx-neonjnx-emmc
- step1: download environment on Linux x86 ubuntu PC
method 2
Backup emmc
cd ~/
mkdir mntTemp
sudo mount /dev/mmcblk0p1 mntTemp
cd mntTemp
sudo tar -jcf ../customerEMMC.tbz2 *
sync
cd ../
sudo umount mntTemp
rmdir mntTemp
- Restore emmc
<div>
  <iframe
      src="https://sftp.adlinktech.com/image/EOS-JNX/sop/Restore_emmc.mp4"
      width="640" height="385"
      scrolling="no" framespacing="0" webkitallowfullscreen mozallowfullscreen allowfullscreen>
  </iframe>
</div>
cd ~/ mkdir mntTemp sudo mount /dev/mmcblk0p1 mntTemp sudo tar jxf customerEMMC.tbz2 -C mntTemp sync sudo umount mntTemp rmdir mntTemp