How to flash image?
Step 1: Download image to your host pc with Ubuntu
Neon-2000-ONO
- eMMC image - required if changing Jetpack version
- Jetpack 6.1 emmc image MD5:7c4b8a25a7abcda047fefde757315059
- Jetpack 5.1.2 emmc image MD5:1863fa4d85d1624f9f2901886ee19d60
Checksum
Check the md5 checksum to make sure image file is correct
- Linux
$ md5sum [file]$ md5sum mfi_jetson-orin-nano-neon2000-ono_4-36.4-rel.1v2.0.tbz2Windows 10
$ certutil -hashfile [file] MD5$ certutil -hashfile mfi_jetson-orin-nano-neon2000-ono_4-36.4-rel.1v2.0.tbz2 MD5
Step 2: Flash eMMC image
This step involves connecting the NEON camera to the Host machine and flashing the image.
To perform this step the following equipment is required:
- A bare metal machine running Ubuntu. Must not be a virtual machine
- microUSB cable
- 2 x pin jumpers
There is also a video and PDF showing the process
On the Host PC unzip the file downloaded in Step 1
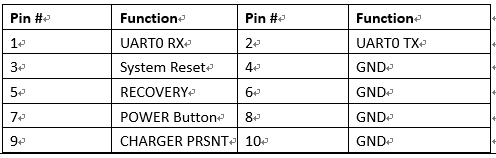
sudo tar -I lbzip2 -xf mfi_jetson-orin-nano-neon2000-ono_4-36.4-rel.1v2.0.tbz2Put the NEON into recovery mode You can refer to pin definition below, and try to enter recover mode.
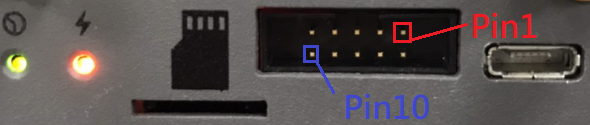
- Power on the NEON
- Short pins 5 and 6 (recovery), using the provided jumpers
- Short pins 3 and 4 (reset), for 2 seconds until the power LED goes out using the provided jumpers
- When the jumper for pins 3 and 4 is removed the power LED will light up again
Connect the microUSB cable to the NEON and the Host PC
Open a terminal and execute the
lsusbcommand, to see if the NEON is connected. If a device calledNvidia Corp.is detected, the device has successfully entered recovery mode.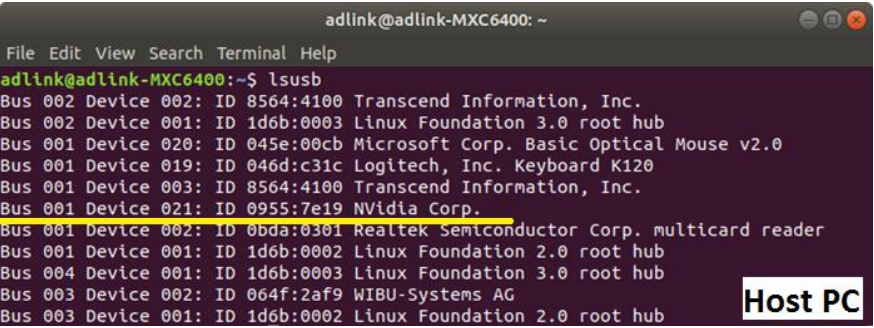
Go to folder unzipped in step 1
cd mfi_jetson-orin-nano-neon2000-ono_4-36.4-rel.1v2.0Flash the Neon-2000-ONO
sudo ./tools/kernel_flash/l4t_initrd_flash.sh --flash-only --massflash 15 --network usb0Once the flash script is complete and shows
Flash complete (SUCCESS)reboot the NEON
Below is a video of the process to flash a NEON